

Other recent blogs


An early manifesto of automation includes simple tasks with creating macros and commands that could be saved and recalled with a keystroke, where macros relieve the resources from repetitive tasks.
Today’s Automation has gone far beyond simple macros and is available in platforms that range from single user to enterprise-grade robotic process or better known as RPA (Robotic Process Automation).
Automation Anywhere RPA platform provides a robust solution for automating business processes using simple bots trained by recording the manual activities. And the Web Control Room on the Automation Anywhere plays a crucial role in making the environment perfect for the bots to perform the diverse automation tasks.
What is web control room in Automation Anywhere Platform?
The Web Control Room is a web-based centralized server of Automation Anywhere RPA platform called the Enterprise Control Room. It enables monitoring, deploying, and scheduling bots anywhere and anytime.
Enterprise Control Room should be installed in a dedicated server that provides the users with browser-based access to monitor and administer large, multi-site complex automation infrastructure with increased collaboration and optimized productivity.
The Web Control Room accommodates scaling of multiple clients and users environments by uploading/downloading MetaBots, and MetaBots enabled tasks.
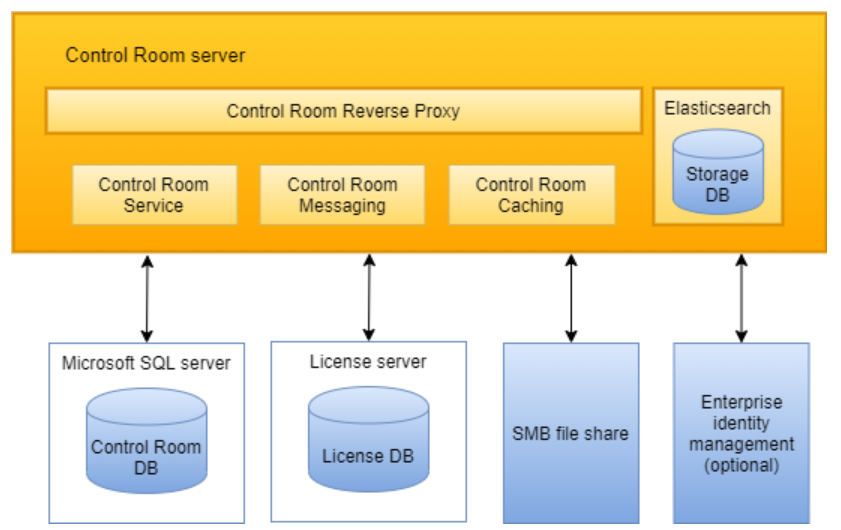
Control Room is installed in one server of a data center and can interact with servers/components in other data centers. The Control Room includes objects each for serving different functionalities, such as Centralized Automation Deployment, Centralized Access Control, and Collaboration of Centralized Workforce Management.
What are the components of the Web control room?
The Web Control Room of Automation Anywhere platform has various components required to create and train bots for automation. The components include:
- Control Room Settings
- License Management
- Support Site
- User Profile
- Features Panel
Understanding the settings in web control room
Control Room settings enable the users with admin privileges to configure and update the Control Room Settings like Repository Path, Web Socket Service, Control Room Access URL, Version Control, Outgoing Mail Server, Email Notifications, Credential Vault and URLs for App Management and so on.
- License Management
The License Management component enables the Control Room Administrator to manage the installation, distribution, and allocation of licenses to clients. The two aspects of the License Management console include:
• New License Installation
• License Allocation
The purchase and subsequent license allocation are subject to Enterprise Client type that need to be defined, either as Development or as Runtime.
- Support Site
Users can navigate to the Control Room's server support site with a single click on the Control Room Panel's top right corner. It helps the users get the ability to work with different components and commands of the Control Room.
- User Profile
This component displays the user who is currently accessing the Web Control Room.
- Features Panel
From the Features Panel, users can view and access all the Control Room commands necessary to manage a bot. Features pane helps the Control Room to:
- Simplify and improve monitoring and administration
- Access and manage tasks and clients/users
- Monitors the task progress and status of the Bots
- Upload and Download IQ bots with vision skills
Bots in Automation Anywhere Platform RPA Platform
- Task Bots
Task Bots are responsible for the execution of tasks and form base for all Automation Anywhere functions. They execute repetitive, rule-based tasks that rely on structured data and are more comfortable. Task bots operate on the presentation layer of any desktop-based application and can complete multiple-step processes around the clock with no errors.
- Meta Bots
Meta Bots are like building blocks. Meta Bots are available in the Automation command library in the Automation Anywhere Enterprise RPA platform and can be leveraged by any Automation task bot. They are used in place of scripting or VB Macros. A user can leverage existing Meta Bots or can create new Meta Bots using a Meta Bot designer. IQ Bots
IQ bots are next-generation intelligent bots that allow developers to add cognitive capability while automating processes. IQ bots, with vision skills, are the first step to implementing RPA with cognitive abilities. IQ Bots use cognitive ability to extract information of semi-structured and unstructured data. With every human validation, it learns and grows smarter.Web control room helps develop, manage, and execute the bots
The Enterprise Control Room is connected to Bot Creators, and Bot Runners help manage the digital workforce development and execution.
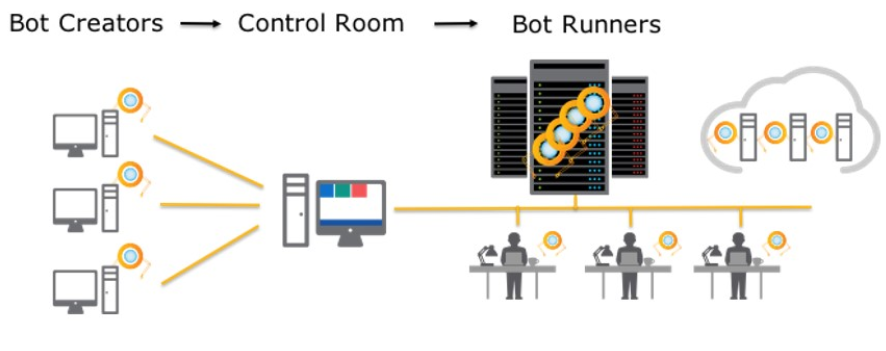
(Bot Creators are the developers who use desktop-based applications to create bots, whereas Bot Runners is the environment/machine where the bots are executed.)
Bots are the software applications that can be trained by recording human actions and later repeating the recorded steps without human intervention. The bots automate a process rapidly without errors. Automation Anywhere RPA platform provides the user with three bots, as mentioned above. These bots can automate business processes based on the business analysis made. The bots can be created using recorders provided by the enterprise RPA platform.


